Trying to place your 55 inch tv stand with mount? A TV wall mount installation can be a simple and straightforward procedure. When you’re finished, your flat screen TV will be in an elevated position, perfect for viewing from just about any angle. Ready to begin? This article provides complete, step-by-step instructions that show you how to mount a TV on the wall.
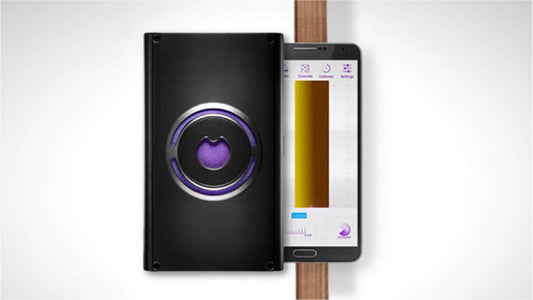
If you’ve been looking for a good wood stud finder, then you already know there are many options available. But there’s only one wood detector that lets you see through walls, so you can find studs, plumbing, electric wires, and more.
Tools for Mounting Your TV to the Wall
You’ll need just a few simple tools to take care of this job.- Wall mount kit sized to support your TV
- Cord cover (optional)
- Power drill and appropriate bits
- Level or phone level app
- Phillips screwdriver (optional)
- Pencil
- Painter’s tape
- Large sheet of cardboard or paper
- Stud finder (we recommend Walabot DIY)
- Tape measure
- Socket wrench with appropriate heads
Important safety tip: Do not use hollow wall anchors or drywall anchors for this task. They cannot support the weight of a TV.
Step-By-Step Guide: How to Wall Mount a TV
1. Choose the right TV mount.
There are two basic TV wall mount types. The first one is designed to keep the TV flat against the wall, in a stationary position. The second features an adjustable swivel that allows you to change the viewing position. Both types have their advantages: The flat version is very inexpensive and ideal for tight spaces, while the articulating or swivel TV mount lets you watch from nearly any angle. When choosing a TV wall mount, make sure that the mount is right for your TV’s weight and size. Once you have chosen your mount and gotten it home, read the instructions on how to mount a TV like yours to the wall. Note that different TV brands are configured differently, so take a moment to familiarize yourself with the back-mounting area.2. Remove the base from your TV
If your TV is attached to a base, use a Philipps screwdriver to carefully remove the screws and detach the base from the TV. Lean the TV against the wall a short distance away from your work area. Keep the screws and the base together in case you decide you’d like to use the base again at a later date.3. Attach the TV mount to the back of your TV
Follow the instructions that came with your mount. Use the supplied screws to attach the bracket portion of the mount to the back of your TV.4. Decide on a location and test a template
You probably have a good idea about where you’d like to mount your TV. Start by creating a template of your flat screen by cutting a piece of cardboard or paper about the same size as your TV. Use painter’s tape to secure it to the wall in the spot you’ve chosen. Sit down and see how it feels to view the TV from your favorite seat.- Check to ensure that the template is centered.
- Test the viewing angle from different parts of the room.
- Make sure the TV is at the right level. If it’s too high, you’re likely to strain your neck while watching.
- Lightly mark the outline with painter’s tape, and then remove the template from the wall.
5. Mark the desired bracket height
Temporarily attach the TV wall mount to the bracket on the back of the TV. Measure from the bottom of the TV to the bottom of the wall mount so your TV will hang at the desired level. Use your findings to mark the correct height on the wall where you’ll be hanging your TV.6. Locate studs
All wall mount TV stand types need to be supported by studs. We recommend the Walabot DIY Stud Finder for this job. It will find your studs quickly and easily while ensuring that you avoid dangerous or expensive accidents that can happen if you accidentally drill into an electric wire, gas pipe, or plumbing pipe.- Attach the Walabot DIY device to a compatible mobile phone
- Open the Walabot DIY app
- Choose your wall type – concrete or drywall
- Calibrate the Walabot DIY (this takes about 30 seconds)
- Use Pan mode to scan the wall. The Walabot DIY will show you an overview of the studs.
- Switch to Images mode to zero in on the studs and look for items like pipes and wires, so you’ll be able to avoid them.
- Finally, click over to Expert mode to mark the center of the stud


