
Installing custom wall lighting can dramatically enhance the ambiance and functionality of your living space. However, it requires careful planning, attention to electrical safety, and a good eye for design. This guide will walk you through the steps for wall lighting installation and answer common related questions.
Why Custom Wall Lighting is Beneficial
Custom wall lighting not only adds style and personality to your home but also improves visibility and highlights architectural features. Properly installed wall lighting can create a warm and inviting atmosphere, making your space more comfortable and appealing.
Tools and Materials Needed:
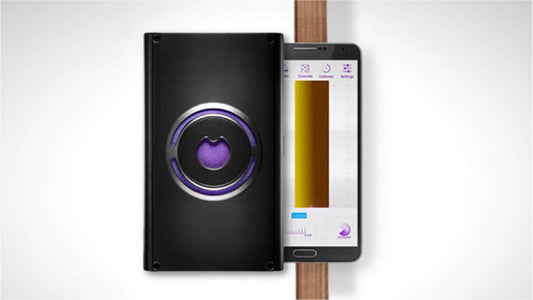
- Walabot stud finder
- Measuring tape
- Level
- Pencil
- Drill and drill bits
- Electrical box
- Wire stripper
- Voltage tester
- Screwdriver
- Wall-mounted light fixture
- Electrical wire
- Wire nuts
- Electrical tape
- Circuit tester
- Safety goggles and gloves
Step-by-Step Guide to Wall Lighting Installation
Preparation:
- Choosing the Location:
- Select a location for your wall lights that enhances the room's design and provides adequate illumination. Consider the height, spacing, and placement relative to furniture and other fixtures.
- Gathering Tools and Materials:
- Collect all necessary tools and materials. Ensure you have the right type of electrical box and light fixture for your installation.
Ensuring Electrical Safety:
- Turning Off the Power:
- Turn off the power to the circuit you will be working on at the main electrical panel. Use a circuit tester to ensure the power is off.
- Using a Walabot Stud Finder:
- Use the Walabot stud finder to locate studs and avoid any hidden wires or pipes. Mark the stud positions with a pencil.

Installing the Electrical Box:
- Marking the Installation Spot:
- Mark the spot where you want to install the electrical box. Ensure it is centered on the stud for a secure installation.
- Drilling the Hole:
- Use a drill to cut a hole for the electrical box. Make sure the hole is the correct size for the box you are using.
- Installing the Electrical Box:
- Secure the electrical box to the stud using screws. Ensure it is flush with the wall surface.
Running Electrical Wires:
- Running the Wires:
- Run electrical wires from the power source to the new electrical box. Use wire staples to secure the wires along the studs.
- Stripping the Wires:
- Use a wire stripper to remove about 3/4 inch of insulation from the ends of the wires.
- Connecting the Wires:
- Connect the wires from the power source to the wires from the light fixture. Match the black wires (hot), white wires (neutral), and green or bare wires (ground). Secure the connections with wire nuts and wrap them with electrical tape.
Installing the Wall Light Fixture:
- Mounting the Light Fixture:
- Attach the mounting bracket of the light fixture to the electrical box. Ensure it is level and securely fastened.
- Connecting the Light Fixture Wires:
- Connect the wires from the light fixture to the corresponding wires in the electrical box. Use wire nuts and electrical tape to secure the connections.
- Attaching the Light Fixture:
- Attach the light fixture to the mounting bracket. Secure it with screws and ensure it is properly aligned and stable.
Testing and Final Touches:
- Restoring Power:
- Turn the power back on at the main electrical panel. Use a circuit tester to ensure the fixture is receiving power.
- Testing the Light:
- Turn on the light switch to test the fixture. Ensure it operates correctly and check for any loose connections.
- Final Adjustments:
- Make any necessary adjustments to the fixture's position and ensure all screws are tight. Install the light bulbs and any decorative elements.
FAQ Section
Do you need an electrician to install wall lights? While installing wall lights can be a DIY project, it is recommended to hire an electrician, especially if you are unfamiliar with electrical work, to ensure safety and compliance with local codes.
How to install wall light wiring? To install wall light wiring, turn off the power, run electrical wires from the power source to the electrical box, connect the wires, and secure them with wire nuts and electrical tape.
How do you install an electrical box for a light fixture on the wall? Install an electrical box by marking the spot, drilling a hole, securing the box to a stud, and ensuring it is flush with the wall surface.
What kind of electrical box do I need for a wall light? Use a standard wall-mounted electrical box designed for light fixtures. Ensure it is compatible with your wall type and the weight of the fixture.
What is a wall-mounted light fitting called? A wall-mounted light fitting is commonly called a wall sconce or wall light fixture.
How much does it cost to install a wall light fixture? The cost of installing a wall light fixture varies depending on the complexity of the installation and whether you hire a professional. On average, it can range from $100 to $300 per fixture.
How are wall lights wired? Wall lights are wired by running electrical wires from a power source to the light fixture, connecting the wires using wire nuts, and securing the connections with electrical tape.
Installing custom wall lighting involves careful planning, adherence to electrical safety guidelines, and attention to design. By following these steps and using the right tools, you can achieve a secure and stylish installation. For more DIY tools and guides, visit Walabot's website.